


 SUNDAY RUNS are the best. We wake up at 5.30am so that we can start our run by 6.30. Faizz plans the route the night before and since he loves dirt-road runs, we often end up visiting the off beaten tracks. This Sunday's run was the Bukit Timah Nature Reserve and the trees there are just magnificent. Faizz and Cherk (co-runners) had to wait for me alot cos I was stopping and staring at trees.
I knew I had to do something about my tree. Right after I came home, surfed the net for tutorials (didn't find much) and then showered, I set off for Bras Basah's craft shops. I eventually bought so many things (all dollhouse related), I need another post to list them all.


Anyway, with all that distractions, I reached home at only 3pm and immediately set down to "play". I took a long hard look at Tree and decided it had to be reshaped. So I glued and clipped the branches that I thought would add more height and volume to Tree and made it straighter. Elmer Carpenter's wood glue claimed to be quick setting but it really is not.
 In the meantime, my little elf, Fafa has helped me picked out more moss. So I laid out my finds from the craft shops and these are HIGHLY recommended for anyone who wants to preserve real plants. These floral spray are from "Design Master" and come in too many colours. Here's what it says on the can: Design Master is formulated to provide the professional florist or developer with a versatile and valuable colour tool. Here is a product delicate enough to colour and preserve real flowers."
If you are preserving moss, a good colour is Basil. Moss Green is actually too dark and will not come up nicely in minis since they look black in small scale.

Anyway, I use Basil on the front of the moss and Moss Green on the back. The colour came out really nicely and still maintain the natural essence of the plant. Amazingly, it dries almost immediately and does not stick to your hand.
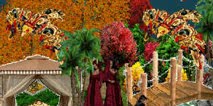
While waiting for Elmer to dry, I started blogging about "How Not to Make a Miniature Tree-Pt 1" 2 hours later at about 5.30pm, I took out the clips from Tree whereupon it looked decidedly healthier (1st pic below). I then started "styling" the tree by placing the moss over the branches in a test run and after I got the shape and look I like (2nd pic below), I applied glue on the moss and branches. You will see that Tree (3rd pic below) ended up looking slightly different from Test Tree because it fell before I applied the glue and I could not remember what went where.


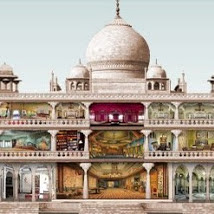
All's well that ends well for Tree, I believe. At certain angle, it even looks taller than Termite House -to be re-named "Bombay Tea Leaves -Where the Party Never Ends" after I learn how to wire up the place ll:I (worried smiley)
 Here's my taller, healthier and yet undeniably old tree that has seen the births and passing of many a Maharajah. If you feel like making a miniature tree, I hope I have shared enough to let you know that it really is not that difficult at all. As if you don't know that already.


That is a fantastic tree! Really nice work and thanks for the tutorial if I ever want to try myself! (Not likely)
ReplyDeleteI tried to use real miniature trees in Nora and Helmer's garden, but I gave up because everything went so messy when I gave them water, so now I have just plastic trees.