


 I was coming home from my usual 5km run on Thursday evening when I found this dead branch on our driveway, screaming to be made into a miniature tree. It had come from the palm tree we
 have in our garden. If you look at the close up picture of the tree (right of the 2 on your left ), you can see how it used to look like with its fruits.
The "tree" stands at 13" high and and is too small for an old 1:12 Bodhi /Banyan tree which I had wanted for my palace (see Day 12 for details). Never mind, I decided to try making it anyway.

So the 1st thing I did was to find the tree a base. It just happened to fit into this wooden base (see 1st pic). This base had come with some plants I bought for my fish tank a few months back. The plants and all my fishes have since gone on to a better place but I kept all the wood base. As you will be able to see from the picture of the kitty litter (the one below the one below), this base already has 3 holes drilled through them.
 I then went into the garden and started gathering material. Picture on left shows the 1st harvest. Took more of the dead branches because I thought they would be good for the roots that hung down from the branches, (see real banyan tree pic), some angsana seeds, cos they are pretty, some small roots and MOSS.
Eventually I used only the MOSS and maybe 2-3 pieces of roots. Quite obviously, the most important ingredient is MOSS and wow, let me tell you, they sure make great foliage, much to my surprise. Sometime back, I had tried to cultivate moss indoor but it was useless and since then, I stopped respecting MOSS and didn't think you can do much with them. I was WRONG. Those in my garden, which come in the most brilliant basil / lemon green turn out to be gems. More about that later.
I tried to use Xerxes' litter basket because that was the only container big enough for the work. Even then, I managed to dirty almost the entire floor of my dining room with sand and soil to the dismay of everyone else in the house.
Anyhow, I decided that the tree would not stand in the centre of the base but on the right so that maybe there would be a bit of space for a rock landscape.So the tree went into the right hole and I started working on the wood base by gluing the moss on, piece by piece. Very messy work because the moss kept getting stuck to my fingers. After the 1st hole was done, I then stuck roots into the 2nd hole and glued them in place. After that, more moss until the whole base was covered to my satisfaction.
Back we go then, to the garden because I ran out of moss. I also needed to study the real trees for reference. While I was out, I thought I should also whip out my camera for some photo opportunities . So here they are, my tree at Stage 1 (my camera is actually quite good for outdoor shots!)
 I then went into the garden and started gathering material. Picture on left shows the 1st harvest. Took more of the dead branches because I thought they would be good for the roots that hung down from the branches, (see real banyan tree pic), some angsana seeds, cos they are pretty, some small roots and MOSS.
Eventually I used only the MOSS and maybe 2-3 pieces of roots. Quite obviously, the most important ingredient is MOSS and wow, let me tell you, they sure make great foliage, much to my surprise. Sometime back, I had tried to cultivate moss indoor but it was useless and since then, I stopped respecting MOSS and didn't think you can do much with them. I was WRONG. Those in my garden, which come in the most brilliant basil / lemon green turn out to be gems. More about that later.

I tried to use Xerxes' litter basket because that was the only container big enough for the work. Even then, I managed to dirty almost the entire floor of my dining room with sand and soil to the dismay of everyone else in the house.
Anyhow, I decided that the tree would not stand in the centre of the base but on the
 right so that maybe there would be a bit of space for a rock landscape.So the tree went into the right hole and I started working on the wood base by gluing the moss on, piece by piece. Very messy work because the moss kept getting stuck to my fingers. After the 1st hole was done, I then stuck roots into the 2nd hole and glued them in place. After that, more moss until the whole base was covered to my satisfaction.
Back we go then, to the garden because I ran out of moss. I also needed to study the real trees for reference. While I was out, I thought I should also whip out my camera for some photo opportunities . So here they are, my tree at Stage 1 (my camera is actually quite good for outdoor shots!)


I then continued by gluing moss on the tree until the tip of all the branches were covered (according to real trees). I also made some tree accessories which I quite liked and finished only at about 1.30pm (started at 6.30am in the morning). Here are the accessories:
1stly, mushrooms:
1stly, mushrooms:
 Oh please, those are my reference mushrooms from the garden, created by God. The ones below are mine:
See the mushrooms on left of the tree Close-up of my "giant" mushrooms below ( my garden has them as well but not in "bloom" serious, these are to scale). My mushrooms are made from pot pourri. Just picked the ones which most resemble and glued them onto base. The one behind even has a stem which can't be photographed nor seen )
 Close-up of my "giant" mushrooms below ( my garden has them as well but not in "bloom" serious, these are to scale). My mushrooms are made from pot pourri. Just picked the ones which most resemble and glued them onto base. The one behind even has a stem which can't be photographed nor seen )
 Then there is the bird's nest, modelled after the one residing in my mother's bougainvillea plant (mum has almost godlike green fingers):
 And lastly, my favourite fern:
 Don't ask me what fern this is, it's my favourite cos I made it. The "realistic" looking leaves were from a very very old plastic plant we put in the kitchen behind the stove. The leaves have been blackened, thanks to years of wonderful cooking. This fern was also made with moss (see how versatile moss is) and pot pourri.
So,as you can tell, I was quite pleased with what I had done
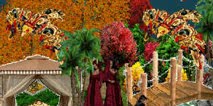
 and then the camera flashed
 WHAT WAS THAT??
I couldn't believe my eyes so I took the tree out to the garden where my camera seemed to love and
 I am in tears now as I typed (from laughing). This won't do! Especially not after all those exquisite flowers by Jayne and Sylvia and then there's Mercedes' garden patch and shucks, Sumaiya just posted another exquisite doll which she has made for me. (oh, she's so gorgeous but that's another post)...
Cont..Part 2


No comments:
Post a Comment