


 A PROJECT that completely absorbed and exhausted me for the weekend, I am still suffering from its aftermath. For I have worked a marathonic [sic] 33 hours non-stop since 3pm Saturday on building this temple, almost as bad as the Queen Anne. This is not counting Friday night and Saturday morning .
 At Day 40 & 42, I recorded the genesis of this project. Yes, it started with a dead (but not rotten nor gone) tree branch which I have made into a tree. My 1st tree and loving it ! When Mercedes' Buddha a
 rrived on the same day I bought the temple kit, I knew I have to start on the temple NEXT.
As you can see, Tree has acquired new occupants, brought home on Thursday evening with a load of other wild animals which I may never get to use. Just as well I got Monkey and Dog to keep Tree company as Buddha is moving !
Friday evening and I was ready to start . I opened up the construction kit and stared at it for a while. The instruction sheet looked simple enough. And it was, for a while..


Shortly past midnight and I have already finished assembling the base and the 1st floor. At this point, I even emailed Mercedes to tell her how "really easy" it was to build with this kit.


After this point however, I was cracking my head on how I should convert an obviously Chinese pagoda into an Indian stupa. Not much I could do at that hour, so I packed everything into a neat corner and went to bed.
Saturday morning, bright and early, I started researching on pagodas in India and this is what I found:


ORIGINS OF PAGODAS
Ancient Chinese architecture boasts a rich variety of styles and high levels of construction... All these architectural forms were recorded in early documents of Chinese history. Pagodas, however, appeared relatively late in China. A Chinese term for pagoda did not exist until the first century. The reason is that this new form of architecture was introduced to China only when Buddhism spread to the country.
The origin of pagodas, like that of Buddhism, can be traced to India. (Aha!) The relation between Buddhism and pagodas is explained in Buddhist literature, which says that pagodas were originally built for the purpose of preserving the remains of Sakyamuni, the founder of Buddhism. According to Buddhist scripture, when Sakyamuni's body was cremated after his death, his disciples discovered that his remains crystallized into unbreakable shiny beads. They were called sarira, or Buddhist relics, as were his hair, teeth and bones. Later, the remains of other Buddhist monks of high reputation were also called sarira. Since more often than not, no such precious shiny beads could be found in the ashes of cremated Buddhist monks, other things, such as gold, silver and crystal objects or precious stones, were used instead.
In Sanskrit pagoda (or stupa) meant tomb. Before the pagoda was introduced to China, it had already had a considerable period of development in India. Beside serving as tombs, pagodas were built in grottoes or temples for offering sacrifices to people's ancestors. When the Indian word for pagoda was first translated into Chinese, there were some twenty different versions...
In case you are wondering, the pictures of the pagodas above are those of China, Thailand, India, Japan and Burma respectively. Even more interesting is the transformation of ancient stupas to present day Chinese pagodas:
 Even at this time, I still thought I could make some modifi- cations to transform temple left (the real Temple of Heaven in China which the kit is modelled after) to temple right which is the temple I really want. The Mahabodhi Temple (Literally: "Great Awakening Temple") in India is where Siddhartha Gautama, attained enlightenment and became Buddha. It has a huge giant Buddha and next to the temple, to its western side, is the holy Bodhi Tree. Can you see our connection?
SuZ popped by late morning and we both decided to use Fatepur Sikri as a reference point and create a pink sandstone temple. We even mixed the paint together to make sure we got the colour. We then went out to buy groceries and I also went to Spotlight, Carrefour and Daiso to see if I can find textured paint. No luck. Reached home at 3pm and started working on the temple again. By the time I finished, it was 12 midnight on Sunday! I don't think I left that table except to spray paint or visit the loo or look for something.
Anyway, this is how the progress went:
 I first painted the base and the 1st floor "Sandstone Pink". In order to add the texture to the surface of the exterior walls, I used paper egg cartons so while I waited for the paint on the temple to dry, I painted the egg cartons and the brass embellishments I intended to use on the walls, the same shade of pink.
I then tore the egg carton into small bits and using craft glue, pasted them onto each and every piece of the square tile forming the base. When the glue dried, I painted over the finished parts to give it an even look. I then glued the embellishments on so that they looked like they were carved out from the "sandstone". I painted everything again after that.

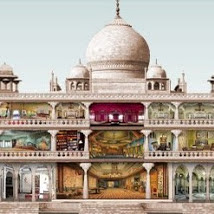
This part of the temple took almost 13 hours to complete and was the most tedious of the whole process but it gave the walls a more realistic feel, I think. See close-up.
Before I worked on the top, I assembled what I was going to put inside the temple and worked on the steps:
 The "giant" Buddha which will eventually span 2 1/2 levels:
 As you can tell from the picture on top, it was bright and sunny by then (Sunday). It was when I was working on the steps that I thought I would make the beams "wooden" so that this temple has an "old" feel as Buddhist temples are no longer built this way. So I spray painted the beams "October Brown". Below is a close up of the beams:
 I don't know how time flew from then on but everything seemed to take longer after that. I guessed I was working on sheer determination by then as my brains, hands and eyes were all failing. By the time I finished spray painting the last batch of beams, it was almost 10pm Sunday night!!
The other tricky part about this kit was fitting the parts together especially the windows to the slots on both the top and bottom pieces. There were altogether about 38 windows and I remembered at one point, I was appealing to Buddha to please help make it easier. Despite the exhaustion, the sight of the mess in the dining room and the fact that I could not tolerate it for another day spurred me to suffer the ordeal some more and so here it is, my "Palace Pagoda"-(Maha Stupa, perhaps?) If you are not bored by now, here's more shots of the temple:
Palace Pagoda with Tree:
 Pagoda's carved top which was bought separately, like many many of the things on this temple:
 As you can see, the top can be removed
 which means that until my palace is built and Pagoda is moved to the palace grounds, it can serve as an incense holder. Pictures below were taken when I lighted the candles and the incense.
 And for a full 2 minutes until the candle burnt out, my glowing Pagoda:
 I wish though that it is more Maha Bodhi rather than Fogong Pagoda Temple (China)
 If you have any suggestions to make it more Maha Bodhi or how I can improve on the process, please do let me know. I can always buy another kit.


Hi, I found your website and saw your work with the the woodcraft construction kit. I was wondering if you would like to exchange some plans (drawings map) , what do you think? I have 21 more models. Thanks Nando
ReplyDeleteHi Nando, I am not sure what you mean by drawings map/plans. Do you mean the plan that came with the kit?
ReplyDelete